If you’re new to sending in your song for mixing, you’re probably wondering how do I prepare and send in my song files?
It’s pretty easy and this guide will walk you through the general idea of what you need to do, if you already get the concept of exporting your files, please follow the DAW specific guides on our upload page.
What Is Exporting?
First thing you’re probably wondering is what does it mean to export the individual tracks?
When you record a song in your recording program, you’ll notice that it’ll have a beat track and vocal tracks.
When you send in a song for our mixing and mastering service, we need those tracks separated into individual tracks.
I should also mention another word for exporting is “bounce”, so you may have heard an audio engineer say, “Can you bounce those tracks?”. This just means, “Can you export those tracks?”.
Also you may have heard someone say “Can you send the stems?”, stems is just another word for ‘individual tracks”.
Exporting Beat Stems
Second thing is, if you’re able to get the beat tracked out, meaning you’re able to get the individual tracks that make up the beat such as the kick track, bass track, piano track, snare track, etc., you can also send in those tracks as well.
Same Starting Point
Thirdly, one of the most important (yet overlooked) things when sending tracks for song mixing is making sure they are exported from the same starting point.
There is nothing more frustrating and time consuming for an audio engineer than to have to guess where each track goes (Believe me I know first hand!).
I’ve had a few artists tell me “Can’t you just place them where they’re supposed to go?”.
Yes I could but I would have to tap out the tempo of the beat and then play with it for another 10 to 30 minutes -major waste of time when I could be mixing and mastering your song to make it sound amazing!
Besides I’d rather your vocals and hook be exactly where you recorded them and not even a millisecond off as vocal timing in every genre is crucial.
I even had one time when after I got the vocals placed as best I could, the artist said “hey they sound off!”.
Great!
Now I have to go back and figure out if they should be a few milliseconds forward or a few milliseconds backwards.
If the artist had just the presence of mind to send the tracks all starting at the same time, we could have saved a bunch of time as well as hassle.
So all you new artists out there remember when you’re sending your tracks out to be mixed, make sure they’re all bounced from the start of the song!
Let me just end this rant and get to the point, which is why you’re here.
Okay so here’s the wrong way to export your tracks
As you can see the vocal selection is highlighted but it is not highlighted from the start of the song, also the beat isn’t muted, so you’re just exporting the vocals and beat mixed together.
Rookie mistake.
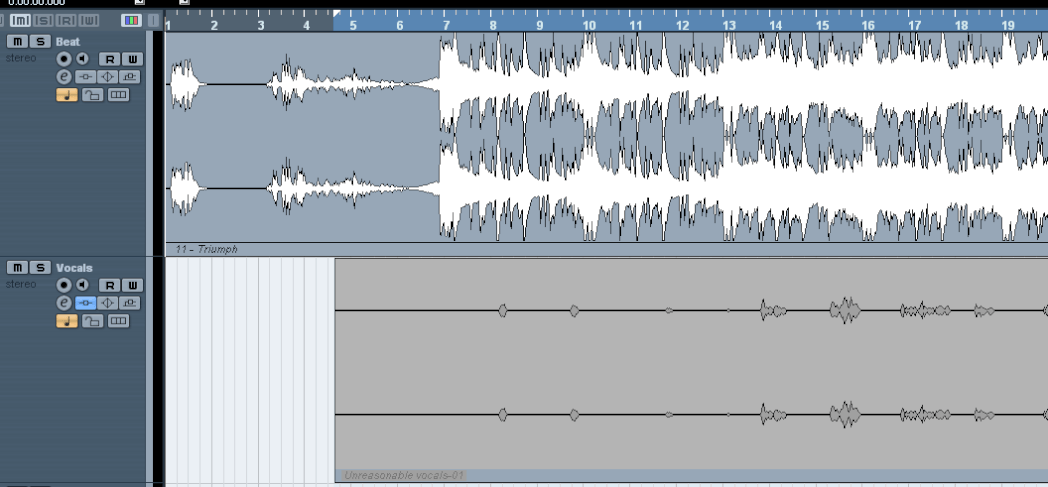
Here’s the right way to export your tracks

First you mute the beat so that only the vocals are on.
Than you highlight the track from the beginning of the song so that the blank space will be in before your vocals placing them where they need to be.
Keep in mind, this method is only for programs where you can’t batch export individual tracks such as Audacity and Garage Band. For all other programs, follow the guide on our upload page.
Here’s what your tracks should look like when exported
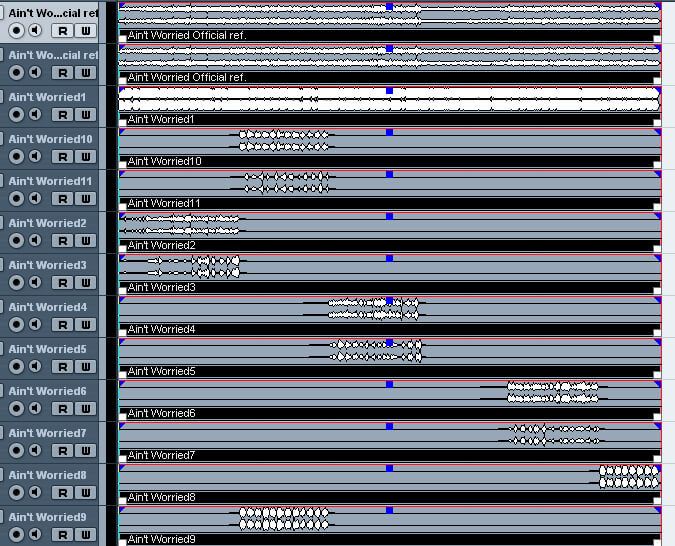
You see all tracks are lined up starting from the beginning.
Export the Beat
Instead of sending the mp3 you got from the producer, a good idea is to also export the beat from the recording session as it’ll include any latency when you recorded.
To export your beat, you just mute your vocals and leave your beat on.
Also make sure you highlight from the start of your song again!
Double Check
Before sending your tracks make sure you’ve listened to them for any glitches which may have occurred during the exporting process and to make sure that their timing is right.
You can do this by loading the tracks you just exported into a new session and seeing if everything lines up.
It’s good to do this as you don’t want to waste time and bandwidth re-uploading your tracks.
Music editing is much like tailoring: you measure twice, cut once.
Export Tracks According to Your DAW
We actually have a ton of guides on how to export tracks for mixing based on the recording program (DAW) you’re using. Below you can find all our guides:
How to Export Individual Tracks in Pro Tools in 3 Steps
How to Export Individual Tracks in FL Studio For Mixing
How to Export Individual Tracks in Logic Pro X For Mixing
Trick to Exporting Individual Tracks in Audacity For Mixing
How to Export Individual Tracks in Cubase
How to Export Individual Tracks in Adobe Audition in 2 Minutes

I sent my track before reading this so please let me know if I need to change anything.
Sonar has a quick bounce function, but I have read that a better file will result if I play the complete song all the way through to record each track.
Because this music thing is all just for me and costs me nowt, that has been good enough up to now. Now money is involved (because I can’t mix to save my life, let alone master) and someone else will be judged as well.
Now the song coming to you has 22 tracks, which means 3 minutes 10 seconds, times twenty-two tracks is over 68 minutes. Do you know what my wife expects me to do in 68 minutes!!???! Plus I have to mute and unmute and bounce down and get every third one wrong and do it again and so forth. Best part of a day gone!
What I need you to tell me is, will all this stuffing about really result in a better file and enable you to do a better job? And none of your slick Canadian answers ya hear. Just nice and simple so an Aussie can understand. Remember I have those headphones you made me buy so I can HEAR EVERYTHING mate.
LOL Yes because we’ll have control over each individual track in the song, which allows the audio engineer to get the desired sound in the mix and then in the master.
Sorry, I know this is an old-ass post…. 20+ year Cakewalk/Sonar user here. You DO NOT have to export each track one at a time, and I’ve never heard a difference between “fast bounce” and real time.
Just highlight all tracks (and make sure the earliest track starts on a downbeat!), export audio and select “tracks” from the source category. You can leave “fast bounce” selected. Make sure your sample rate and bit depth match what you recorded. And turn off dithering (you only need dithering when you’re changing sample rates). You’ll have to choose the rest of the settings based on your particular needs.
Cheers!
I see you offer session stems in your mixing&mastering. What do people use these for?
I’ve put plugins and EQ on my tracks. Does that makes a difference?
does it matter if i send you vocals at -12 Db? Do you have a preference?